3D Model Viewer


Adds a block which supports display and control of 3D models, built on Google's model-viewer web component.
ConcreteCMS 3D Model Viewer Add-on
This package adds a new block, "3D Model Viewer", to the "Multimedia" section of the block editor which allows the user
to display a 3D model and adjust various parameters of its control and display. More technically, this package is a wrapper for Google's <model-viewer> web component.
Installation
Before attempting to install this add-on, ensure the following requirements are met:
- Concrete5/ConcreteCMS: Version
8.5.0or later. - PHP: Version
7.4.0or later.
To install the package, perform the following steps:
- Copy the
abwd_model_viewerfolder into your website'spackagesfolder. - Visit your website and log in.
- In the Dashboard, navigate to the Extend Concrete or Extend Concrete5 page (depending on your CMS version).
- Press Install next to the
3D Model Viewerpackage. - Wait for the page to refresh - You should receive a confirmation that the package was installed.
Model Compatibility
Only GLB-formatted models may be used in this model viewer; any type other than .glb is not supported, and existing models will need to be converted to GLB before they may be used. This package will automatically add .glb to the allowed upload file types in the CMS (see Dashboard > System & Settings > Files > Allowed File Types). It will also remove this type from the allowed types list when the package is uninstalled. If you still need to upload files with the .glb extension after the package is uninstalled, you will need to manually re-add it to the list inside the dashboard.
Configuration Options
A brief overview of the 3D Model Viewer Block's settings can be found in this section.
Model
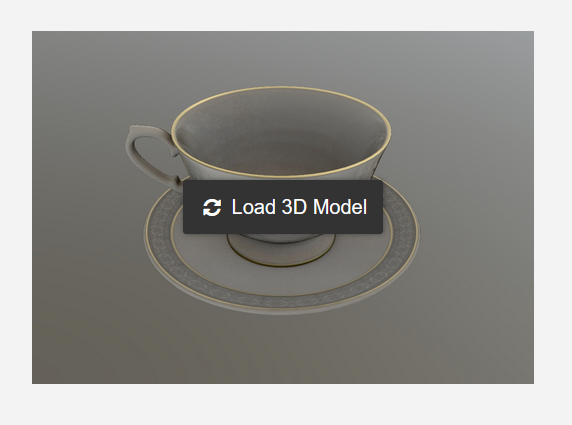
- Poster Image (required): An image that will show before/during the loading of the model viewer. Also serves as a fallback when the model viewer is not supported on the end user's device.
- Model File (required): The model file. Currently, only
.glbfiles are supported. - Alternative Text (required): Descriptive text about the model for users who cannot access/operate the model viewer. Similar to an image's alternative text.
- Viewer Initialization: Controls when the viewer starts up. If set to automatic, the viewer will typically start up when the page loads (as soon as your model file is loaded on the page). If manual, the poster image will display with a "Load 3D Model" button on top of it; clicking this button will begin the loading process. (Default: Automatic)
- Loading Style: Controls when the model file is loaded. (Default:
Auto)-
Auto, which will load the model file into the viewer whenever it starts up -
Eagerwhich will load the model file as soon as possible (usually on page load) -
Lazywhich will load the model when the viewer is about to be scrolled into view on the page
-
Controls
- Enable Orbit: Enable/Disable the user's ability to rotate the camera around the model (Left Click + Drag)
- Enable Panning: Enable/Disable the user's ability to pan the camera across the model (Right Click + Drag)
- Enable Zoom: Enable/Disable the user's ability to zoom the camera in and out (Scroll Wheel)
- Enable UI Buttons: Enable/Disable a UI inside the viewer which will allow for Orbit and Zoom control of the model (if enabled), as well as a "reset" button that returns the camera to its original position. On extra-small screen sizes (< 576px) these buttons will hide automatically.
- Orbit, Zoom, Panning Sensitivity: Individually control the sensitivity for the inputs. Higher numbers make the model move more in the desired direction from the user input, while lower numbers make it move less.
Style
- Scene Background Color: Flat color to be displayed behind the model. The default value is transparent, but the model viewer's skybox essentially makes it white by default.
- Responsive Sizing: Enable responsive scaling of the model viewer based on screen size. The viewer will take up 100% of the width of its parent container (if possible) but will not extend past 80% of the screen's height (to allow room for touch-based scrolling).
- Width and Height: If responsive sizing is disabled, you may explicitly set a width and height of the model viewer, using pixels (
px) or percent (%) values. Note that using percentages without explicit width/height settings on the block's container may produce unexpected results. Width and Height are required if responsive sizing is turned off.
Accessibility
- Enable Accessible Descriptions: Allows for fine-tuned accessible descriptions of the model; if enabled, you may summarize or describe individual parts of the model for users of assistive technologies, as well as set customized interaction prompt text.
AR (Advanced)
- Enable AR Where Available: If the user's device supports Augmented Reality, enabling AR mode will show a UI button in the model viewer allowing for the model to be placed in an Augmented Reality scene.
- Enable Resizing of Models in AR: If enabled, models will be user-scalable within the AR scene.
- Enable AR Lighting Estimation in WebXR Mode: If the AR scene is rendered using WebXR, enabling this will project estimated lighting onto the model from the scene. Since this is done in real-time, it often carries a big performance hit.
- Model Placement: Where the model should be placed within the AR scene (Floor or Wall).
Troubleshooting
If the model viewer is behaving erractically or not working at all, the following checks may be useful:
-
Ensure that your model file is a valid
.glbpackaged model. If possible, try importing it into other software to verify that it isn't corrupted. Additionally, you may try loading a sample model from the "Sample Models for Testing" section below. If the sample model loads, it's likely that there is an issue with your model file. - Ensure that the poster image file is a valid image. A corrupt or missing image will fail to show before and during model loading, and if the model viewer encounters an error while displaying the block may disappear entirely.
- Ensure the block's settings are correct. For example, if you're unable to rotate or zoom on the model, these settings may be turned off in the block's settings. Return to edit mode and edit the block with the issue to verify that the settings are correct.
- Ensure there are no WebGL Conflicts. The model viewer uses the WebGL browser technology to render 3D models. If you have any other custom functionality that utilizes WebGL on your page, it may interfere with how the block works. Try placing your block on a blank page, or one without the other functionality, to see if it resolves the issue.
Still running into issues? Contact me on the Marketplace or Report an Issue.
Error Fallback
The Model Viewer Block will attempt to stay visible during errors by doing the following:
- If any errors occur during the loading or display of the model, the poster image will be displayed instead.
- If the model file is corrupt or missing, the poster image will display perpetually.
- If the poster image is corrupt or missing, there will be no poster image before or during the loading of the model (will be the background color).
- If both the model and poster are missing, the block will disappear from view. If this happens, an "Empty 3D Model Block" rectangle will appear in the block's original location when the CMS is in edit mode.
Reporting Issues
For bug reporting, please submit a ticket to the GitHub Issue Tracker and include the following information in your ticket:
- What you were trying to do when the issue occurred (what you expected to happen versus what actually happened).
- Any error text or message(s) displayed at the time of the issue.
- The steps to reproduce the error, if possible.
(Note: Posting an issue will require registering for a free GitHub account if you do not already have one. You may also message me directly on the ConcreteCMS marketplace if you do not wish to do this.)
Resources
Sample Models for Testing
The Khronos Group maintains a repository of sample models on their GitHub Page. For most of these models, a "Download GLB" button can be found beneath the image on the left side of the table - this can be used to download .glb files for testing or use on your own website (the licenses for each model are listed to the right of the image on that page).
Converting Models to glTF Binary (GLB) Format
Most modern 3D modelling software should have the capability to export your 3D Model(s) as glTF binary packages with the .glb file extension. Blender is a popular free and open-source program that supports this. Guides on importing and exporting models to/from Blender are outside the scope of this documentation but are widely available online - as a reminder, you must save your model files in .glb format, NOT .gltf as they are not supported at this time.
Original Web Component
You may view the original project that this add-on was derived from by visiting the Model Viewer Project Website
License
This add-on and the asset build scripts are Copyright © 2024 Alec Bielanos. They are both distributed under the Apache License, version 2.0. Additional details are located in the LICENSE.txt file.
Third-Party Licenses
The file icon.png is are derived from Bootstrap Icons, which is distributed under the MIT license.
See NOTICE.txt for further information. View Icon License
This project contains code derived from the ConcreteCMS project, which is distributed under the MIT license.
See NOTICE.txt for further information. View CCMS License
The model viewer web component is Copyright 2024 Google, distributed under the Apache License, version 2.0. This project is in no way affiliated with, nor endorsed by, Google or its subsidiaries. View Model Viewer License